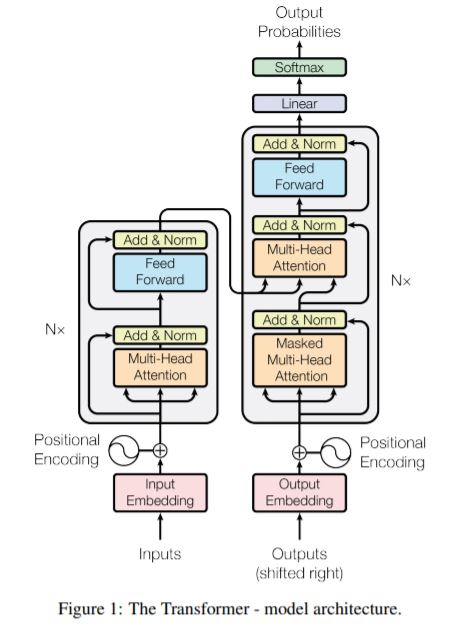
Attention is All You Need (NIPS 2017) 포스트에서 Transformer 모델의 구조를 리뷰하였다.
오늘은 모델의 구조를 단순히 컨셉적으로 이해함을 넘어 Pytorch로 어떻게 구현되는지 확인해보자.
워낙 유명한 모델이다 보니 Pytorch 홈페이지의 Tutorial에도 잘 정리되어 있으니 이걸 보고 따라해보자.
nn.Transformer
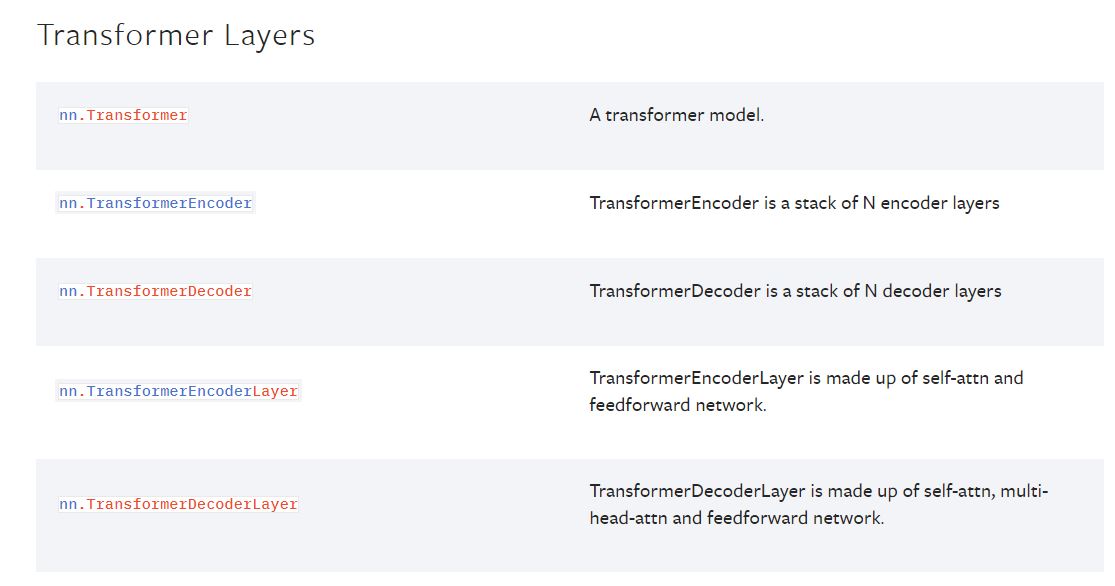
PyToch 1.2 version 부터 Attention is All You Need 논문에 기반한 모듈을 제공해왔다. 논문 내용에서 알 수 있듯이 nn.Transformer 모듈은 draw global dependencies between input and output & superior in quality for many sequence-to-sequence problems라는 특징을 가지고 있다.
논문에서는 Transformer 모델을 machine translation tasks 를 해결하는데 사용하였지만, Tutorial에서는 그보다는 비교적 간단한 language modeling tasks에 적용한다. Language Modeling Task는 문장의 다음 단어가 무엇일지 예측하는 과제이다.
Language Model의 Output을 얻는 과정은 Input과 유사한 차원 크기로 Decoding하는 것이 아니라 단순히 Linear Layer를 태우는 것이다. 따라서 논문에서 사용됬던 Encoder-Decoder Attention 과 같은 기교들을 사용할 필요 없이 간단하게 모델을 구현하는 것이 가능하다. 물론 그렇다고 이것의 구현이 쉽지만은 않다. 침착하고 정교한 복붙을 통해 한 줄 한 줄 이해해보려 한다.
1
2
3
4
5
6
import math
import torch
import torch.nn as nn
import torch.nn.functional as F

from torch.nn import TransformerEncoder, TransformerEncoderLayer
1
2
3
4
5
6
7
8
9
10
11
12
13
14
15
16
17
18
19
20
21
22
23
24
25
26
27
28
29
30
31
32
33
34
35
36
37
38
class TransformerModel(nn.Module):

    def __init__(self, ntoken, ninp, nhead, nhid, nlayers, dropout=0.5):
        super(TransformerModel, self).__init__()
        self.model_type = 'Transformer'
        self.src_mask = None
        self.pos_encoder = PositionalEncoding(ninp, dropout)
        encoder_layers = TransformerEncoderLayer(ninp, nhead, nhid, dropout)
        self.transformer_encoder = TransformerEncoder(encoder_layers, nlayers)
        self.encoder = nn.Embedding(ntoken, ninp)
        self.ninp = ninp
        self.decoder = nn.Linear(ninp, ntoken)

        self.init_weights()

    def _generate_square_subsequent_mask(self, sz):
        mask = (torch.triu(torch.ones(sz, sz)) == 1).transpose(0, 1)
        mask = mask.float().masked_fill(
            mask == 0, float('-inf')).masked_fill(mask == 1, float(0.0))
        return mask

    def init_weights(self):
        initrange = 0.1
        self.encoder.weight.data.uniform_(-initrange, initrange)
        self.decoder.bias.data.zero_()
        self.decoder.weight.data.uniform_(-initrange, initrange)

    def forward(self, src):
        if self.src_mask is None or self.src_mask.size(0) != len(src):
            device = src.device
            mask = self._generate_square_subsequent_mask(len(src)).to(device)
            self.src_mask = mask

        src = self.encoder(src) * math.sqrt(self.ninp)
        src = self.pos_encoder(src)
        output = self.transformer_encoder(src, self.src_mask)
        output = self.decoder(output)
        return output
Tutorial에서 Transformer의 구조가 논문과 다른 부분들이 조금 있는데, Task가 다르기 때문에 발생한 차이이다. 우선 Output이 가장 등장 확률이 높은 단어 하나 이기 때문에 Decoder의 형태를 띄지 않고 Linear Layer 한 층으로 간소화됬다. 또한 언어 모델링 과제를 위해서는 Self - Attention 과정에서 이전 포지션의 단어들만 참조하도록 뒤의 단어들에 대한 attention mask를 사용한다.
여러 Object Method들을 한 눈에 보기에 너무 많으니 객체 속성들과 함수들을 하나씩 봐보자.
- TransformerModel modules
PositionalEncoding
1
2
3
4
5
6
7
8
9
10
11
12
13
14
15
16
17
class PositionalEncoding(nn.Module):

    def __init__(self, d_model, dropout=0.1, max_len=5000):
        super(PositionalEncoding, self).__init__()
        self.dropout = nn.Dropout(p=dropout)

        pe = torch.zeros(max_len, d_model)
        position = torch.arange(0, max_len, dtype=torch.float).unsqueeze(1)
        div_term = torch.exp(torch.arange(0, d_model, 2).float() * (-math.log(10000.0) / d_model))
        pe[:, 0::2] = torch.sin(position * div_term)
        pe[:, 1::2] = torch.cos(position * div_term)
        pe = pe.unsqueeze(0).transpose(0, 1)
        self.register_buffer('pe', pe)

    def forward(self, x):
        x = x + self.pe[:x.size(0), :]
        return self.dropout(x)
Positional Encoding은 embeded된 input에 고정된 값을 더해주는 모듈이다.
- max_len은 들어올 수 있는 input sequnce의 최대 길이이다.
- d_model은 input의 feature dimension이다.
1
2
3
4
5
6
7
8
9
10
11
12
max_len = 10
d_model = 6

pe = torch.zeros(max_len, d_model)
position = torch.arange(0, max_len, dtype = torch.float).unsqueeze(1)
div_term = torch.pow(10000, torch.arange(0,d_model,2).float()/d_model)

pe[:, 0::2] = torch.sin(position / div_term)
pe[:, 1::2] = torch.cos(position / div_term)

print(div_term)
print(pe)
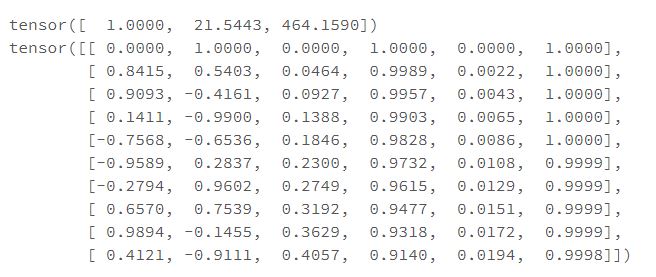
transformer_architecture_positional_encoding라는 kzaemnejad 씨의 블로그 포스트에 다양한 기법들이 소개되어 있는데, Transforemer에 사용된 sin / cos 기반의 positional encoding의 장점은 (1) input dimension과 동일한 크기의 벡터로 생성 가능하고 (2) 모델이나 Input의 형태와 무관하게 고정된 값을 갖는데 있다. 또한 div_term을 통해서 input dimension이 매우 길었을 때, positional encoding이 모델에 너무 크게 관여하는 것을 방지한다.
TransformerEncoderLayer
1
2
3
4
5
6
7
8
9
10
11
12
13
14
15
16
17
18
19
20
21
22
23
24
25
26
27
28
29
30
31
32
33
34
35
36
37
class TransformerEncoderLayer(Module):
    def __init__(self,
                 d_model,
                 nhead,
                 dim_feedforward=2048,
                 dropout=0.1,
                 activation="relu"):

        super(TransformerEncoderLayer, self).__init__()

        self.self_attn = MultiheadAttention(d_model, nhead, dropout=dropout)

        # Implementation of Feedforward model
        self.linear1 = Linear(d_model, dim_feedforward)
        self.dropout = Dropout(dropout)
        self.linear2 = Linear(dim_feedforward, d_model)

        self.norm1 = LayerNorm(d_model)
        self.norm2 = LayerNorm(d_model)
        self.dropout1 = Dropout(dropout)
        self.dropout2 = Dropout(dropout)

        self.activation = _get_activation_fn(activation)

	def forward(self,
                src: Tensor,
                src_mask: Optional[Tensor] = None,
                src_key_padding_mask: Optional[Tensor] = None) -> Tensor:

        src2 = self.self_attn(src, src, src, attn_mask=src_mask,
                              key_padding_mask=src_key_padding_mask)[0]
        src = src + self.dropout1(src2) # 1.
        src = self.norm1(src) # 2.
        src2 = self.linear2(self.dropout(self.activation(self.linear1(src)))) # 3.
        src = src + self.dropout2(src2) # 4-1.
        src = self.norm2(src) # 4-2.
        return src
MultiheadAttention
- positional encoding이 완료된 embeded input을 받아서 self-attention을 수행한다.
- 해당 부분은 아주 중요하니 뒤에서 따로 다루겠다.
Feedforward Model
attn layer 이후에 residual connection + droput
LayerNorm() 함수를 통해 d_model 차원의 data에 대해 Layer Normalization over a mini-batch.
(200 -> 2048 -> 200)순서로 Sparse AutoEncoder의 형태로 forward를 수행한다.residual connection + dropout -> Layer Normalization
generate_square_subsequent_mask
1
2
3
4
5
6
7
8
9
def _generate_square_subsequent_mask(sz):
    mask = (torch.triu(torch.ones(sz, sz)) == 1).transpose(0, 1)
    mask = mask.float().masked_fill(mask == 0, float('-inf')
                                   ).masked_fill(mask == 1, float(0.0))
    return mask

src = ['a','b','c','d','e']

_generate_square_subsequent_mask(len(src))
mask 값에 -inf를 취하는 이유는 softmax 이후의 결과값을 0으로 얻기 위함이다.
TransformerEncoder에는 위의 attention mask 이외에도
key padding mask라는 모듈도 있다.모든 문장의 k번째 단어를 masking하고 싶을 때 활용할 수 있는 Masking 기법이다.
따라서
attention mask는 인풋 sequence의 길이 S에 대응하는 (S,S)의 Matrix를 생성하고,key_padding_mask는 batch size N에 대응하는 (N,S)의 Matrix를 생성한다.
nn.Embedding
모델링의 흐름을 생각해보면, 우선 모든 문장에 존재하는 단어들에 대한 단어장을 만드는 작업이 선행된다. 그 이후, 각 문장을 단어장의 index에 대입하여 numericalize하는 작업을 수행한다. 결국 모델의 인풋으로 들어가는 것은 각 문장이 어떤 숫자들의 list 형태이다.
1
2
3
4
5
6
7
8
9
encoder = nn.Embedding(10, 5)

# token set의 크기를 10으로 한정 지었기 때문에 k의 자리에 10 이상의 숫자는 들어올 수 없다.
# (EX) encoder(torch.tensor([100]))  -->> 에러 발생

# 하나의 단어(숫자)는 dim (1,5)의 텐서로 출력된다.
# 한 번에 여러개의 단어를 집어 넣는 것도 가능하다.

print(encoder(torch.tensor([1,2,3])))
MultiheadAttention(d_model, nhead, dropout=dropout)
1
2
3
4
5
6
7
8
9
10
11
12
13
14
15
16
17
18
19
20
21
22
23
24
25
26
27
28
29
30
31
32
33
34
35
36
37
class MultiheadAttention(nn.Module):

    def __init__(self, embed_dim, num_heads, dropout=0., bias=True, add_bias_kv=False, add_zero_attn=False, kdim=None, vdim=None):
        super(MultiheadAttention, self).__init__()
        self.embed_dim = embed_dim

        self.num_heads = num_heads
        self.dropout = dropout
        self.head_dim = embed_dim // num_heads

        self.in_proj_weight = Parameter(torch.empty(3 * embed_dim, embed_dim))

        self.register_parameter('q_proj_weight', None)
        self.register_parameter('k_proj_weight', None)
        self.register_parameter('v_proj_weight', None)
        self.register_parameter('in_proj_bias', None)

        self.out_proj = _LinearWithBias(embed_dim, embed_dim)
        self.bias_k = self.bias_v = None

        self.add_zero_attn = add_zero_attn
        self._reset_parameters()

    def _reset_parameters(self):
        xavier_uniform_(self.in_proj_weight)

	def forward(self, query, key, value, key_padding_mask=None,
                need_weights=True, attn_mask=None):

        return F.multi_head_attention_forward(
                query, key, value, self.embed_dim, self.num_heads,
                self.in_proj_weight, self.in_proj_bias,
                self.bias_k, self.bias_v, self.add_zero_attn,
                self.dropout, self.out_proj.weight, self.out_proj.bias,
                training=self.training,
                key_padding_mask=key_padding_mask, need_weights=need_weights,
                attn_mask=attn_mask)
MultiheadAttention을 조금 간단하게 보기 위해서 실제 Pytorch Implementation에서 더욱 간소화했다.
특이사항
- K / Q / V의 dimension이 모두 같다 가정한다.
- Attention Score 계산 과정에 bias의 작용은 제거한다.
사실 위의 클래스만 봐서는 pytorch 안에서 어떻게 self -attention이 작동되는지 확인할 수 없다. 클래스에 정의된 여러 parameter를 갖고 forward의 F.multi_head_attention_forward 함수가 어떻게 작용하는지 확인해보자. 그러나 사실 컨셉적인 부분들을 이해했다면 Layer를 구성하는 최소 단위의 함수를 굳이 뜯어볼 필요는 없다고 생각한다. 조금 TMI라고 생각하기 때문에 궁금한 사람만 펼쳐보도록 하자.
F.multi_head_attention_forward 함수 자세히 보려면 펼치기
(출처)github / torch / funcional.py
1
2
3
4
5
6
7
8
9
10
11
12
13
14
15
16
17
18
19
20
21
22
23
24
25
26
27
28
29
30
31
32
33
34
35
36
37
38
39
40
41
42
43
44
45
46
47
48
49
50
51
52
53
54
55
56
57
58
59
60
61
62
63
64
65
66
67
68
69
70
71
72
73
74
75
def multi_head_attention_forward(query,                           # type: Tensor
                                 key,                             # type: Tensor
                                 value,                           # type: Tensor
                                 embed_dim_to_check,              # type: int
                                 num_heads,                       # type: int
                                 in_proj_weight,                  # type: Tensor
                                 in_proj_bias,                    # type: Tensor
                                 bias_k,                          # type: Optional[Tensor]
                                 bias_v,                          # type: Optional[Tensor]
                                 add_zero_attn,                   # type: bool
                                 dropout_p,                       # type: float
                                 out_proj_weight,                 # type: Tensor
                                 out_proj_bias,                   # type: Tensor
                                 training=True,                   # type: bool
                                 key_padding_mask=None,           # type: Optional[Tensor]
                                 need_weights=True,               # type: bool
                                 attn_mask=None,                  # type: Optional[Tensor]
                                 use_separate_proj_weight=False,  # type: bool
                                 q_proj_weight=None,              # type: Optional[Tensor]
                                 k_proj_weight=None,              # type: Optional[Tensor]
                                 v_proj_weight=None,              # type: Optional[Tensor]
                                 static_k=None,                   # type: Optional[Tensor]
                                 static_v=None                    # type: Optional[Tensor]
                                 ):

  	# tgt_len = Input에 몇 개의 문장이 들어왔는지
    # bsz = 각 문장에 단어가 몇 개인지
    # embed_dim = 각 단어가 크기 몇으로 벡터화됬는지

    tgt_len, bsz, embed_dim = query.size()

    # 멀티 헤드 어텐션을 사용하기 때문에 embed_dim은 head_dim * head 수
    head_dim = embed_dim // num_heads
    scaling = float(head_dim) ** -0.5

    # (하나의 문장, 최대 단어 길이가 10, embed_dim이 5)라고 query를 가정했을 때,
    # query의 shape는 (1,10,5) 라고 볼 수 있다.
    # 앞서 in_proj_weight의 dimension을 (3*embed_dim,embed_dim)으로 정해놓았기 때문에,
    # nn.linear 함수의 (x*A^T) 매트릭스 연산을 수행하면 (1,10,15)의 형태가 된다.
    # q,k,v의 dimension이 모두 동일하다고 가정하였기 때문에 단순히 chunck함수를 사용해서 3등분 해주면
    # q,k,v가 각각 (1,10,5)의 크기가 된다?

    q, k, v = linear(query, in_proj_weight, in_proj_bias).chunk(3, dim=-1)
    q = q * scaling

    # tensor는 is_contiguous() 한 상태에서만 view나 transpose를 적용할 수 있다.
    # multihead attention이 뭔가 initialize를 여러 번하면서 loop를 도는 구조로 생각했었는데
    # initialize는 한 번만 하고 embed_dim을 여러개로 쪼개서 작업되는 것이었다.

    q = q.contiguous().view(tgt_len, bsz * num_heads, head_dim).transpose(0, 1)
    k = k.contiguous().view(-1, bsz * num_heads, head_dim).transpose(0, 1)
    v = v.contiguous().view(-1, bsz * num_heads, head_dim).transpose(0, 1)

    src_len = k.size(1)

    if add_zero_attn:
        src_len += 1
        k = torch.cat([k, torch.zeros((k.size(0), 1) + k.size()[2:], dtype=k.dtype, device=k.device)], dim=1)
        v = torch.cat([v, torch.zeros((v.size(0), 1) + v.size()[2:], dtype=v.dtype, device=v.device)], dim=1)
        attn_mask = pad(attn_mask, (0, 1))

    attn_output_weights = torch.bmm(q, k.transpose(1, 2))

    if attn_mask is not None:
        attn_output_weights += attn_mask

    attn_output_weights = softmax(
        attn_output_weights, dim=-1)
    attn_output_weights = dropout(attn_output_weights, p=dropout_p, training=training)

    attn_output = torch.bmm(attn_output_weights, v)
    attn_output = attn_output.transpose(0, 1).contiguous().view(tgt_len, bsz, embed_dim)
    attn_output = linear(attn_output, out_proj_weight, out_proj_bias)

    return attn_output, None
사실상 Transformer를 구성하는 모든 모듈을 하나씩 봤다고 볼 수 있다. 큰 그림으로 되돌아보면.
n개의 단어로 이루어진 문장을 Input으로 받아 각 단어를 k차원의 벡터로 임베딩하였다.
단어들의 위치에 따라 고유의 성질을 기억할 수 있도록 Positional Encoding하였다.
임베딩한 (n,k) 차원의 데이터를 여러겹의 Transformer Layer에 통과시켰다.
Transformer Layer ==
- Multihead Self Attention Layer
- Drop Out / Residual Connection / Layer Normalization
- Feed-Forward Layer
- Drop Out / Residual Connection/ Layer Normalization
마지막으로 튀어나온 벡터를 전체 단어 개수 N에 Linear Layer로 디코딩하여 아웃풋을 얻는다.
Practice
그러면 Tutorial에 있는 예제를 한 번 돌려보자.
1
2
3
4
5
6
7
import torchtext
from torchtext.data.utils import get_tokenizer

TEXT = torchtext.data.Field(tokenize=get_tokenizer("basic_english"),
                            init_token='<sos>',
                            eos_token='<eos>',
                            lower=True)
get_tokenizer 함수는 Source Text를 어떤 방식으로 numericalize 할지 정의한다.
1
2
3
train_txt, val_txt, test_txt = torchtext.datasets.WikiText2.splits(TEXT)
TEXT.build_vocab(train_txt)
device = torch.device("cuda" if torch.cuda.is_available() else "cpu")
torchtext.datasets의 데이터를 split 혹은 iters 함수를 통해 train과 test 셋으로 분리할 수 있다.
WikeText2 Dataset은 위키피디아에서 Good 혹은 Featured 등급(?)을 받은 여러 Article의 집합체라고 볼 수 있으며 이것의 확장 버전으로 WikiText-103이라는 이름의 데이터도 존재한다.
1
2
3
4
5
6
7
8
9
10
11
12
13
14
15
def batchify(data, bsz):
    data = TEXT.numericalize([data.examples[0].text])
    # Divide the dataset into bsz parts.
    nbatch = data.size(0) // bsz
    # Trim off any extra elements that wouldn't cleanly fit (remainders).
    data = data.narrow(0, 0, nbatch * bsz)
    # Evenly divide the data across the bsz batches.
    data = data.view(bsz, -1).t().contiguous()
    return data.to(device)

batch_size = 20
eval_batch_size = 10
train_data = batchify(train_txt, batch_size)
val_data = batchify(val_txt, eval_batch_size)
test_data = batchify(test_txt, eval_batch_size)
batchify 함수의 input으로 들어가는 data.examples[0].text 단어 단위로 쪼개져있는 문장들의 집합이다.
train_txt.exaples[0].text 의 경우 2,086,708 개의 단어들이 들어가있는 리스트인데 중복은 가능하다.
Numericalize하게 되면 아까 TEXT.build_vocab 함수로 만들어둔 사전에 의해서 단어 → 양의 정수로 변환된다.
이것을 batch_size = 20으로 나누어 각 문장이 최대 단어 20개로 이루어지도록 데이터셋을 가공한다.
train_data는 원래 train_txt의 크기인 2086708을 20으로 나눈 몫이 되어 104,335 길이의 데이터가 된다.
1
2
3
4
5
6
bptt = 35 # 각 배치의 크기
def get_batch(source, i):
    seq_len = min(bptt, len(source) - 1 - i) # 마지막에 배치 크기로 나누어 떨어지지 않을 수 있으니깐
    data = source[i:i+seq_len]
    target = source[i+1:i+1+seq_len].view(-1)
    return data, target
여기서 수행하는 Language Modeling은 이후의 단어들을 예측하는 과제이기 때문에 get_batch 함수를 통해 얻어지는 target은 data가 하나씩 shift된 데이터라고 보면된다.
1
2
3
4
5
6
7
ntokens = len(TEXT.vocab.stoi)  # the size of vocabulary
emsize = 200                    # embedding dimension
nhid = 200                      # the dimension of the feedforward network model in nn.TransformerEncoder
nlayers = 2                     # the number of nn.TransformerEncoderLayer in nn.TransformerEncoder
nhead = 2                       # the number of heads in the multiheadattention models
dropout = 0.2                   # the dropout value
model = TransformerModel(ntokens, emsize, nhead, nhid, nlayers, dropout).to(device)
모델의 형태를 정의하는 여러 Parameter. nhid = emsize로 설정했기 때문에 Feed Forward Layer는 input - hidden - ouput 사이즈가 모두 동일한 오토인코더의 형태로 설정됬다.
1
2
3
4
criterion = nn.CrossEntropyLoss()
lr = 5.0 # learning rate
optimizer = torch.optim.SGD(model.parameters(), lr=lr)
scheduler = torch.optim.lr_scheduler.StepLR(optimizer, 1.0, gamma=0.95)
학습되는 방법들을 정의하는 여러 Parameter.
Train / Eval은 뻔하니깐 펼쳐서 보자
1
2
3
4
5
6
7
8
9
10
11
12
13
14
15
16
17
18
19
20
21
22
23
24
25
26
27
28
29
30
31
32
33
34
35
def train():
    model.train() # Turn on the train mode
    total_loss = 0.
    ntokens = len(TEXT.vocab.stoi)
    for batch, i in enumerate(range(0, train_data.size(0) - 1, bptt)):
        data, targets = get_batch(train_data, i)
        optimizer.zero_grad()
        output = model(data)
        loss = criterion(output.view(-1, ntokens), targets)
        loss.backward()
        torch.nn.utils.clip_grad_norm_(model.parameters(), 0.5) # parameter exploding 방지
        optimizer.step()

        total_loss += loss.item()
        log_interval = 200
        if batch % log_interval == 0 and batch > 0:
            cur_loss = total_loss / log_interval
            print('| epoch {:3d} | {:5d}/{:5d} batches | '
                  'lr {:02.2f} | '
                  'loss {:5.2f} | ppl {:8.2f}'.format(
                    epoch, batch, len(train_data) // bptt, scheduler.get_lr()[0],
                    cur_loss, math.exp(cur_loss)))
            total_loss = 0

def evaluate(eval_model, data_source):
    eval_model.eval() # Turn on the evaluation mode
    total_loss = 0.
    ntokens = len(TEXT.vocab.stoi)
    with torch.no_grad():
        for i in range(0, data_source.size(0) - 1, bptt):
            data, targets = get_batch(data_source, i)
            output = eval_model(data)
            output_flat = output.view(-1, ntokens)
            total_loss += len(data) * criterion(output_flat, targets).item()
    return total_loss / (len(data_source) - 1)
1
2
3
4
5
6
7
8
9
10
11
12
13
14
15
16
17
best_val_loss = float("inf")
epochs = 3 # The number of epochs
best_model = None

for epoch in range(1, epochs + 1):
    train()
    val_loss = evaluate(model, val_data)
    print('-' * 89)
    print('| end of epoch {:3d} | valid loss {:5.2f} | '
          'valid ppl {:8.2f}'.format(epoch,val_loss, math.exp(val_loss)))
    print('-' * 89)

    if val_loss < best_val_loss:
        best_val_loss = val_loss
        best_model = model

    scheduler.step()
학습한다.
1
2
3
4
5
test_loss = evaluate(best_model, test_data)
print('=' * 89)
print('| End of training | test loss {:5.2f} | test ppl {:8.2f}'.format(
    test_loss, math.exp(test_loss)))
print('=' * 89)
평가한다.
Data Dimension
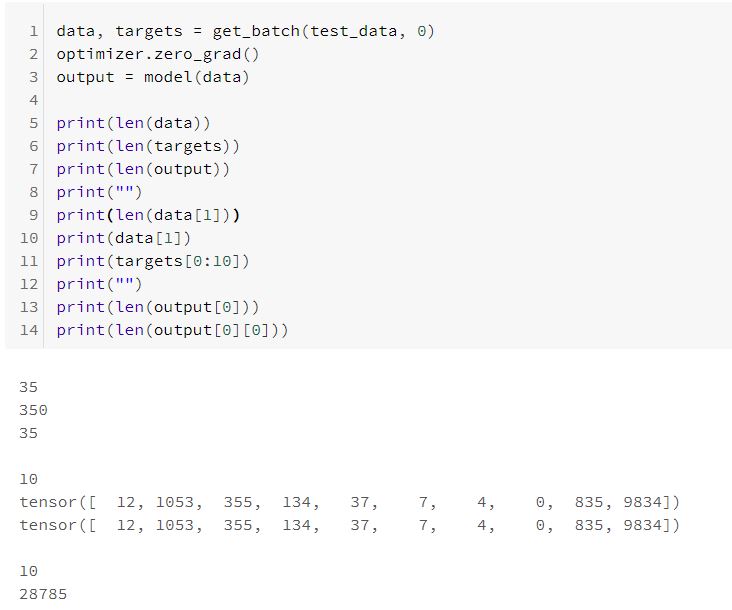
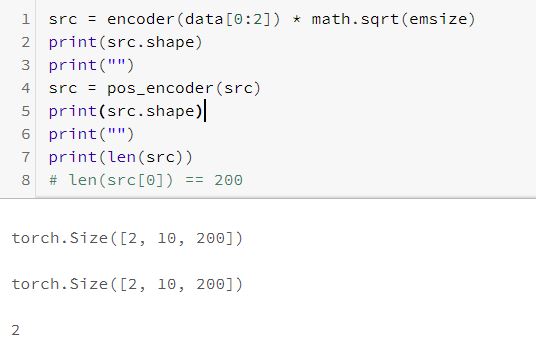
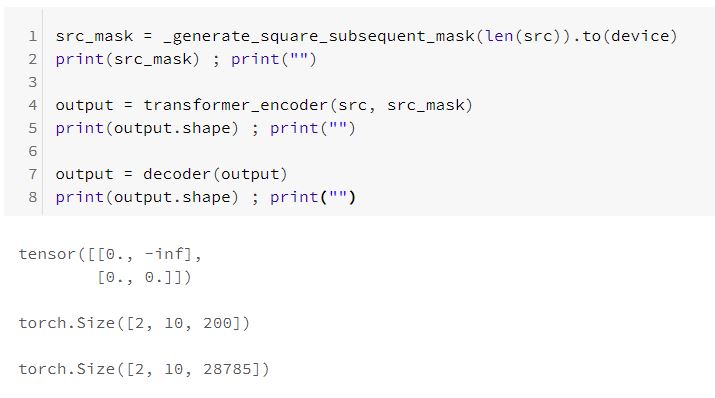
각 과정에서의 Data Dimension을 죄송하지만 귀찮으니 전부 사진으로 첨부한다.
끝
